So, several months ago the idea of going back to school to get my bachelors degree in nursing sounded like a great one.
Clearly I had forgotten how tough nursing school was! WTF was I thinking?? LOL.
Now that school has started I feel like if I am not at work I live in front of my computer studying and agonizing over the next paper I need to write.
Stay tuned for some new nursing school tales!
Thursday, January 19, 2017
Friday, March 8, 2013
Formless method to repairing a broken corner
I'm making this post from my phone, so I REALLY hope it turns out ok! Please forgive any really odd formatting or typos if there are any. My phone makes some strange auto corrects sometimes that I don't always catch!
Have I ever mentioned that I generally dislike sculpting on forms? I can do it, but I'm not a pro and not professionally trained in it, so it takes me quite a bit of time and patience. I'm not known fur my patience and I'm regularly short on time. This is why if I break a nail I prefer to just tip it rather than sculpt a tip. So....... I much prefer this method of repairing a corner that's snapped off, though I can also do this with a form.
This method utilizes self adhesive silk wraps, soak off gel (SOG) and hard gel. The silk wraps are just ones I picked up at Sally Beauty Supply. The hard gel I have us one I've had forever - IBD builder gel. I so rarely use it as I don't break many nails anymore, but if I ever need to replace it ill probably get the Gelish or Entity One hard gel. Use whatever you have/like. This IBD I got at Sally's, so it's locally available. Personally I prefer the pink, I think it looks more natural, but there's nothing wrong with using clear either.
You could also use this method to add a small amount if length, but not a lot. The repairs are sturdy but remember its just a silk wrap so if you tried to add too much it wouldn't stay stiff enough to be a base for the hard gel. You are basically using it as a non-removable form.
I have never really had any trouble soaking this gel off using this method, though I do file the majority if it down before I soak off.
Sorry, no video for this one. It was sort if an impromptu tutorial. I don't have the opportunity to show you guys many repairs, so figured I'd take this one. I'm also right handed and this repair is ON my right hand, so forgive the crummy photography!
The process:
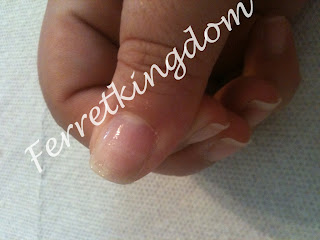
Start by removing any gel/polish from the broken nail. Prep as you normally would before doing a mani. This mani was only two days old so I didn't need any cuticle work or anything. Here you can see my naked nail and its poor broken corner.

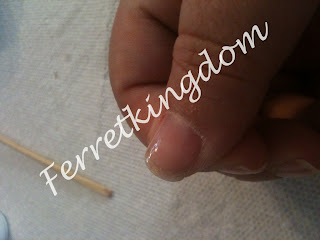
Next thing to do is cut yourself a piece of silk wrap. I use a piece large enough to go about halfway back on my nail, fill in the corner and just-come-to or extend just a tiny bit past the free edge. The wraps I use are self-adhesive and I can't imagine not using them - they stay where you put them! Don't worry if the edge isn't completely even. You will fix that later.

Next you want to get your SOG basecoat. Apply it to the entire nail, including ALL of the silk wrap. Lay it on a bit thicker than you normally would. Not thickly, but not as thin as you normally would do it either for just a SOG mani. You want to really coat the silk wrap, especially where it's filling in the broken corner.
Flash cure it for ten second in a UV lamp. If you use LED just do a couple seconds to set it. Then gently using your other hand shape it so that the c-curve matches your natural nails. Finish curing it fully for whatever time your lamp uses.

Next comes the Hard gel!! Grab a brush (I use a #6 oval gel brush myself) and get ready.

Apply a nice coat of the hard gel to the nail. I do a single coat and personally don't apply it super thin. Not thin like I would a SOG polish. It's not super thick either. You could easily do multiple thin layers, but hard gel doesn't really need to be applied that way. This particular builder gel is thick and doesn't really self-level. I don't know if others do or not, but try to work it smoothly and evenly, let the brush float into the gel. You may need to apply a bit of extra and smooth it around over the filled-in corner to make it all even.
Look at the nail from all angles and make sure it looks relatively smooth and not all lumpy and uneven. thickness should be even from front to back and side to side. Cure for the time needed for your hard gel/lamp combo (for me this is 3 minutes in my UV lamp).


Now it's time to remove the tacky layer and do you finish filing. You want to file the free edge to the correct shape, then make sure the sides are even and match the natural line of your nail. File/Buff the top of the gel to make sure it is even and has no lumps, dips or ridges. If you have any deep dips, remove any filing dust, fill it in with more gel, cure, remove the sticky layer and file/buff again until it's all smooth and even.
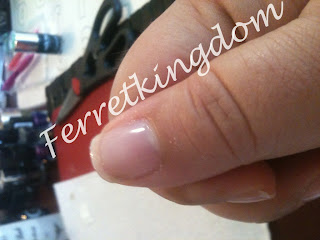
You can see here it's a little bit thicker than my natural nail, but not so much that anyone besides me would notice it.


Now you can finish your SOG manicure! I didn't redo the SOG basecoat, it's not really necessary. Just remove any dust with an alcohol wipe from your hard gel, and then do your color coats and topcoat.
This color by the way is Gelish Lady in Red from this years Year of the Snake two-color set. The other color is a metallic gold.

These repairs always hold up REALLY well for me! I never have any trouble with them lifting or coming off or bending with the hard gel on them. I've used just Gelish Structure on very small broken corners before, and it works but it's much more flexible even with several coats of structure, so I much prefer to use the hard gel. Hope this helps some of you ladies keep from having to file down just because you broke a corner! Happy Polishing!
Here's a quick overview of the steps:

Wednesday, August 8, 2012
OMG! Kindergarten already?!
So, today was my daughter's first day of kindergarten. I cannot believe she is almost FIVE already! Where has the time gone? Really, it seems like just yesterday that I was telling my mother in law I had a long time to worry about where she was going to go to school. DD was only 3 months old when she asked me what kindergarten we were going to send here to!
But, the day has come. She had a good first day. She's been in a structured preschool since she turned 3, and we did VPK last year and summer camp over the summer, so she's no stranger to the idea of "school", which is what we've always called it. And we've been talking about her starting "big girl school" since we got our school assignment in May. She was well-prepared. As was I. I thought.
About a week ago I started getting a bit upset about this whole school idea. I can't even tell you exactly what I was upset about. Was it that she is growing up too fast? Was it the change in our routine (I hate change?). Was it because she was going to a school where she didn't know anyone (she went to a preschool out of our school zone, so all her friends were going elsewhere)?
Perhaps it was all of these things. Or perhaps it was just coupled with the overwhelming amount of change lately (our whole charting system just changed at work a week ago as well). Granted I was prepared for these changes well ahead of time, the actual change was harder to deal with. Again, I hate change. I adjust, and often end up liking it in the end, but during that initial adjustment I have some major angst.
At any rate - the first day of school. We picked out her outfit last night and got her to bed on time for a change. Most of the summer has consisted of staying up late, LOL. With alarms set this morning we managed to get up on time, get her fed and dressed and actually left the house at the time we wanted to.
DH just stopped with us for a few minutes to hug her and say goodbye. He went along this morning to get a feel for how long it would take him to get from there to work. I made sure I had the day off! LOL.
I had to visit the office to deal with her after-school care registration, so we did that and then sat around in front of the school waiting for the early bell to ring so I could walk her to class. We won't be able to walk them to class forever, so I may as well enjoy it while I can, LOL.
She was all fine and dandy up until the point where we got to her classroom and she put her stuff in her cubby and her teacher told her that she had some crayons at her seat and she could start coloring her picture. LOL. Then she started looking a bit apprehensive. She gave me a huge, sad hug and sat down to color. I encouraged her to talk to the other kids at school and not be shy, and reminded her that she'd be fine and she'd make friends quickly. She's only ever shy for a short time, then she becomes very outgoing and makes friends quickly. I knew she'd be fine. I snapped a few pictures, said goodbye and left without turning around again just in case she was watching me. LOL.
I texted a friend who's sons also started kindergarten and VPK today. She was lost and had no idea what to do with no children. I'm sure she found something to keep her busy, LOL. I felt OK. I didn't cry, so that was good. :) I admit to feeling a bit anxious though about how her first day would go.
I picked her up right as school let out because she also had her first day of dance for this year today! Yep, busy busy busy! Her teacher said she had a great day! Of course she did! :) She said it was a good day too. She said she made new friends in her class already, and she had fun. After dance we did her practice work and planned what to do for her homework this week. She had dinner, a bath, story time and I actually managed to get her in bed 30 minutes early! :)
But man am I beat! I feel like I was at school all day! And all I did was clean my office while she was gone at school! LOL. I'm sure we'll settle into a routine pretty quickly. All in all, I think we had a great first day of Kindergarten! :)
Friday, July 20, 2012
Image Stealing and Copyrighting photos
You should never have to tell someone not to use your pictures. Unfortunately, it does happen. A lot.
Recently I discovered (again! Yes, I've had this happen twice) that someone had been taking photos of mine (and many, many others) and using them on a few other blogs they ran. Not just posting them, but using them without any credit to myself or the people who actually took the pictures, and some were used without the permission of the owners of the photos (said photos were not posted publicly on the web). One set of pictures was actually posted on a site where prints of the pictures could be purchased.
Remember, if you take a photo, the copyright to that photo is yours forever, unless you give a copyright release to someone. Don't let people steal your work. And don't ever steal someone else's work! Even when seemingly innocent it's just inappropriate.
Now, were the pictures that were used something of a sensitive nature? No, not at all.
Something that could be sold as stock photos or otherwise used for monetary gain? Sometimes yes, which is the big issue.
My point is this - If you want to repost a photo that you see and like on your own blog, simply ask the owner of the photo for permission to repost. AND ensure that you properly credit the photo and possibly provide a link-back to their blog/site. Everyone wants to receive credit where credit is due.
For anyone out there who posts photos on the web, I highly recommend watermarking them in some way. At least then you will hopefully get credit and stock photo sites, etc. won't buy photos with a watermark. I have many photos I need to go back and watermark. If you notice photos not working from my blog, this is why. It's because I have several things I need to go fix if possible. Unfortunately my main computer is on the fritz and needs repairs, so it may take some time to actually get it done. :-(
There are MANY ways to watermark, from simple apps on phones and free websites to advanced watermarking programs. I use a variety, as I often post pictures on chat forums from my phone, but also do a lot of work from my computer. I do have an iphone app for watermarking (a very simple one called iWatermark) and for doing work on the computer I simply use photoshop. The fastest way is to create a brush in photoshop, so you aren't constantly retyping your text, and you can create a cool brush design if you want to. I used this easy to follow and awesome tutorial from BittBox.
For the record, since it appears it needs to be said, Any photos posted here on my blog, photo hosting sites or anywhere else are not for use on other websites without my permission.
Wednesday, March 7, 2012
Fantasy Fire Givaway Winners Revealed!
Sorry I didn't get to post this last night guys, I was just too tired!
I used www.randomizer.org to randomly choose the numbers assigned to the comments in the order they were posted. The reason the results say 1-30 even though there were 32 comments on the post was because the last post was made after the deadline, and there was one comment that was from the same user, as a reply to her own earlier comment - blogger counts it as a separate comment, I don't since it was the same person.
___________________________________________________________________________________
This means the lucky winners of this Givaway are
1. LC
2. Lilhop
Remember, you have 3 days to contact me, so say by Saturday night, with your name and mailing address. Again, if you have a problem with the other person who donated a bottle to this Giveaway sending you the polish directly, let me know. I'll do my best to accommodate that. Unless both winners have a problem with it, it should be a non-issue.
I used www.randomizer.org to randomly choose the numbers assigned to the comments in the order they were posted. The reason the results say 1-30 even though there were 32 comments on the post was because the last post was made after the deadline, and there was one comment that was from the same user, as a reply to her own earlier comment - blogger counts it as a separate comment, I don't since it was the same person.
| Research Randomizer Results: | |||
| 2 Sets of 1 Unique Numbers Per Set | |||
| Range: From 1 to 30 -- Unsorted | |||
| Set 1 | Set 2 | ||
| 14 | 22 | ||
___________________________________________________________________________________
This means the lucky winners of this Givaway are
1. LC
2. Lilhop
Remember, you have 3 days to contact me, so say by Saturday night, with your name and mailing address. Again, if you have a problem with the other person who donated a bottle to this Giveaway sending you the polish directly, let me know. I'll do my best to accommodate that. Unless both winners have a problem with it, it should be a non-issue.
Sunday, March 4, 2012
Max Factor Fantasy Fire Givaway!!!!!!!!!!!!!!!!!!!!
OK, so since the last givaway was SOOOOOOOOOO much fun, we are going to do another one!
I had a blast being able to give away something people wanted, and it was a lot of fun reading all the comments and checking my blog daily for new ones! LOL.
This giveaway was only made possible by the immense kindness of a dear friend. Really, I am only the owner of the blog and person shipping it here.
My dear friend Kerri sent me some of the Max Factor Fantasy Fire nail polish (Clarins 230 dupes) from the UK a while back. Unfortunately, due to my bad luck with the US postal service, the package was lost in the mail. Because of her amazing generosity, she sent me a replacement for the lost one.
A week or so later my replacement package showed up in my mailbox. It's a GORGEOUS polish. I really, truly love it.
And then, you'll never believe what happned! A few days later...........................

................... The original package shows up! It looked like it had been run over the mail truck several times, but amazingly the polishes remained intact inside!
Because we know there were a lot of people who wanted this color and that it cannot be bought in the US at any local stores, Kerri has agreed to let me do another Giveaway with it!
UPDATE: Thanks to more amazing generosity of another tPF member, I know have TWO bottles of this amazing polish to give away. Tomorrow night I will choose TWO people to send one of these amazing polishes to. To save time, this second bottle will be shipped directly from the member donating it, so when you contact me with your address, I will be forwarding it to her. It just seems silly to have her ship it to me, which would delay shipment to you. If you have a problem with this, please let me know if you are a winner in the giveaway.
What you Get:
This giveaway is for ONE mini-bottle of Max Factor Fantasy Fire.
How you might get it:
Leave a comment on this blog post. :) That's it!
How I pick a winner:
Each post will be assigned a number in order of how they are posted. www.randomizer.org will choose a number for me.
The fine print:
1. Open to US participants only (sorry!)
2. You have until Tuesday March 6, 2012 at 11:59 pm EST to leave a comment on this post
3. After I announce the winner (March 7th barring any emergencies), you have 3 days to contact me via the contact me link in the right sidebar with your name and address.
4. If I do not receive any shipping information, I will choose another random comment
Here is a video - an attempt to show the color shift better than in the photos below.
Here you can sort of see all the colors a little bit:


The red shift:

The green shift:


The golden-orangey-brownish shift:


Wednesday, February 29, 2012
GIVEAWAY WINNERS!!!!
OK everyone! It's winner time! :)
I assigned each comment a number in the order they were posted, then I used www.randomizer.org to choose random numbers.
I assigned each comment a number in the order they were posted, then I used www.randomizer.org to choose random numbers.
|
|
|
|
This means the giveaway winners are
Barb A,
Lindsay, and
Hillary
Congrats Girls!! Email me your address via the Contact Me link on the right sidebar and send me your address. I'll mail these out Friday or Saturday, if I get your addresses. You have 3 days to contact me with your address.
Sunday, February 26, 2012
SOGAA
What is SOGAA, you ask?
Soak-off Gel Addicts Anonymous, of course! LOL.
For all you lovers of SOG polish, please come and join us on facebook. In addition to stalking the Purse Forum's SOG threads, I started a group for us DIY Soak-off gel polish lovers. :-)
I think we encourage the addiction more than we help it though, so be forewarned. :)
If you would like to join us in our addiction, please click on the logo below. Happy Polishing! :)
Wednesday, February 22, 2012
TKB Trading pigment givaway
This is my first Giveaway EVER! :-)
So, I moved all my pigments in baggies into jars today (well, at least until I ran out of jars, LOL).
The baggie I had of TKB Trading's Zirconium Cluster yeilded FOUR jars - this is way more pigment than I will ever use for doing my nails, and that is all I use these pigments for. So, you guys get the benefit of all the extra!
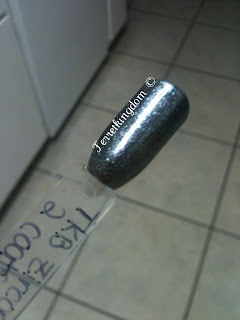
This pigment is a white powder that is super-shimmery. It has sort of a multi-colored shimmer to it. I like mixing it into clear gel and then applying it over a dark color to add shimmer. I'm sure you could also mix it into regular polish for all the frankeners out there. :-)
All you have to do is leave a comment on this post. Next Wednesday, February 29th, I will use a random picker to choose 3 people to receive one of these jars of pigment. The winners will be posted, and then will have 3 days to send me their address via email (there is a link to contact me in the sidebar on the right).
Here is a picture of the three jars. Each winner will receive one jar (click on the images to enlarge them)

Here are a few other pictures. The zirconium cluster is the one on the far left of the photos. You can see it fits right in with the Sparks! Collection, even though it is not part of it. It's about the same particle size though


Good luck everyone! :)
So, I moved all my pigments in baggies into jars today (well, at least until I ran out of jars, LOL).
The baggie I had of TKB Trading's Zirconium Cluster yeilded FOUR jars - this is way more pigment than I will ever use for doing my nails, and that is all I use these pigments for. So, you guys get the benefit of all the extra!
This pigment is a white powder that is super-shimmery. It has sort of a multi-colored shimmer to it. I like mixing it into clear gel and then applying it over a dark color to add shimmer. I'm sure you could also mix it into regular polish for all the frankeners out there. :-)
All you have to do is leave a comment on this post. Next Wednesday, February 29th, I will use a random picker to choose 3 people to receive one of these jars of pigment. The winners will be posted, and then will have 3 days to send me their address via email (there is a link to contact me in the sidebar on the right).
Here is a picture of the three jars. Each winner will receive one jar (click on the images to enlarge them)

Here is what the zirconium cluster looks like when mixed into clear and applied over a black base.

Here are a few other pictures. The zirconium cluster is the one on the far left of the photos. You can see it fits right in with the Sparks! Collection, even though it is not part of it. It's about the same particle size though


Good luck everyone! :)
A different (and maybe better?) way to patch a split nail
So, a day or two into my valentines day mani (wasn't even Valentines day yet! LOL), I got a split in my usual wayward thumbnail. I abuse this poor nail (I know, nails are not tools, LOL) and unfortunately it splits more often than I would like.
So, after a long day of work where I tore it, I came home, ate dinner, put on my jammies and went to repair my split....... only to discover I could not for the life of me find my nail glue buried somewhere on the mess I call a kitchen table! LOL.
So I decided to try something else. I soaked off and carefully removed my SOG from that nail and prepped the nail as I normally do.
I cut my silk wrap to fit over my tear (a bad one too - nearly halfway across my nail) and stuck it over it. I used Gelish basecoat over top of it instead of glue. I scrubbed just a tiny amount over the silk wrap and cured it. I made sure the silk wrap was completely covered with the gel, and that it was scrubbed into all the little silk fibers.
I had a small wrinkle in the silk wrap at one corner that I'd not been able to flatten out, so I removed the sticky layer with alcohol and buffed the wrinkle a little with a 240 grit buffer to smooth it out.
Then I applied Gelish basecoat over the entire nail, cured it, and continued on with my SOG manicure as usual. Because it was late after I'd worked all day, and I had to work again the next day I didn't bother applying structure. I'd fully expected the nail to break completely after a day or two, which is what usually happens when I have splits this bad.
The finished repair and nail felt surprisingly sturdy! I think I did this last Monday, so today would be 8 days on the repair. It's still fine, the only reason I'll be changing up the manicure tomorrow is because I'm ready for a change and the growth is bugging me. :-)
I'm very excited about this and I think everyone should give this repair a try. I absolutely plan on repatching it this same way tomorrow when I redo my manicure. It just seems like the gel layers bond together with the silk wrap so much better than with the nail glue. I've been doing the repairs with the glue as I have shown before for a year, and was a firm believer in that system. This type of repair might work better for everyone, but I think this will definitely be my new system!
This next time I will probably go ahead and apply the structure on that nail, as I'll be doing something with regular polish and I won't have the support from the gel layers.
This was the valentines day manicure.
Two coats of Gelish A New Sunrise Sparkle, then a single coat of Gossip Girl on the tips, then Artsy Fartsy Crafts "Valentine Multi-mix" glitter on the tips, and faded up the nail.

Update:
While I don't have a video tutorial to add, I did take some pictures today when I redid my mani, and thus the repair. (click on the pictures to see them larger)
After removing my old gel and prepping my nails, I cut a piece of silk wrap to make a patch. The ones I use are still the same as those I used in the previous method's video and are self-adhesive. I applied the silk wrap piece as a patch over the split.

It wasn't completely smooth, as I often have a corner of the wrap that folds over and I cant' get it to unfold. No big deal - remove the sticky layer with alcohol and use a 240 or 320 grit buffer to smooth it out where it's bumpy and at the edges.

Apply Gelish basecoat over the entire nail as usual and cure
You can now go about finishing your manicure the same way you always do. Because I was doing something with regular polish this time, I chose to just do a clear manicure, so I followed this with a layer of Gelish Structure and then Top It Off. You cannot see the repair at all, even though a completely clear manicure.
So, after a long day of work where I tore it, I came home, ate dinner, put on my jammies and went to repair my split....... only to discover I could not for the life of me find my nail glue buried somewhere on the mess I call a kitchen table! LOL.
So I decided to try something else. I soaked off and carefully removed my SOG from that nail and prepped the nail as I normally do.
I cut my silk wrap to fit over my tear (a bad one too - nearly halfway across my nail) and stuck it over it. I used Gelish basecoat over top of it instead of glue. I scrubbed just a tiny amount over the silk wrap and cured it. I made sure the silk wrap was completely covered with the gel, and that it was scrubbed into all the little silk fibers.
I had a small wrinkle in the silk wrap at one corner that I'd not been able to flatten out, so I removed the sticky layer with alcohol and buffed the wrinkle a little with a 240 grit buffer to smooth it out.
Then I applied Gelish basecoat over the entire nail, cured it, and continued on with my SOG manicure as usual. Because it was late after I'd worked all day, and I had to work again the next day I didn't bother applying structure. I'd fully expected the nail to break completely after a day or two, which is what usually happens when I have splits this bad.
The finished repair and nail felt surprisingly sturdy! I think I did this last Monday, so today would be 8 days on the repair. It's still fine, the only reason I'll be changing up the manicure tomorrow is because I'm ready for a change and the growth is bugging me. :-)
I'm very excited about this and I think everyone should give this repair a try. I absolutely plan on repatching it this same way tomorrow when I redo my manicure. It just seems like the gel layers bond together with the silk wrap so much better than with the nail glue. I've been doing the repairs with the glue as I have shown before for a year, and was a firm believer in that system. This type of repair might work better for everyone, but I think this will definitely be my new system!
This next time I will probably go ahead and apply the structure on that nail, as I'll be doing something with regular polish and I won't have the support from the gel layers.
This was the valentines day manicure.
Two coats of Gelish A New Sunrise Sparkle, then a single coat of Gossip Girl on the tips, then Artsy Fartsy Crafts "Valentine Multi-mix" glitter on the tips, and faded up the nail.

Update:
While I don't have a video tutorial to add, I did take some pictures today when I redid my mani, and thus the repair. (click on the pictures to see them larger)
After removing my old gel and prepping my nails, I cut a piece of silk wrap to make a patch. The ones I use are still the same as those I used in the previous method's video and are self-adhesive. I applied the silk wrap piece as a patch over the split.

Next I applied Gelish Basecoat gel, making sure to really scrub it into the silk wrap, and cure. This is what you should have.


You can now go about finishing your manicure the same way you always do. Because I was doing something with regular polish this time, I chose to just do a clear manicure, so I followed this with a layer of Gelish Structure and then Top It Off. You cannot see the repair at all, even though a completely clear manicure.

Subscribe to:
Posts (Atom)